Under Carpet Preparations
Under carpet heating can be laid in either new or existing homes or buildings. Under carpet heating is embedded in a self-levelling cement based screed which provides a finish with strength and durability requiring overnight to dry. We are happy to liaise with the carpet layer so there is no time delays. There are a few preparation procedures to take note regarding floor preparation and pre-wiring. Please read on:
Work required to be done by other trades for Under Carpet Heating:
We require the following work to be carried out by other trades to ensure the heating is installed and operates correctly.
Builders Work
Wooden Floors:
These should be made water tight or covered with a layer of tile and slate underlay. The floor is to be clean and free of any cracks, holes or sharp protrusions.
Concrete Floors:
The floor is to be clean, level and free of any cracks, holes or sharp protrusions.
Fixtures & Fittings:
All fixtures and fittings are to be marked out or installed before the heating installation. If floor mounted door stops are to be used please mark out on the floor to avoid damage to the heating.
Electrical Work
This is taken to include but not limited to:
Running all the circuit wiring for each heating zone. Please note that any loads over 1000 watts will need a relay and a control circuit back to the switch board. The electrician will have to connect the power to the thermostat(s) once they have been fitted by Heatwell Ltd.
Supply and fitting the RCD circuit breakers to the switchboard. This is a condition of your guarantee.
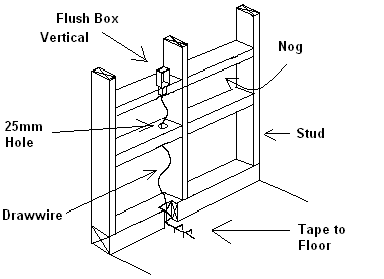
Supply and installing of the draw wires from the thermostat position to the floor. This is done so the element tails can be drawn up at a later date. Please refer to our wiring diagram for draw wire instructions.
All flush boxes for thermostats should be mounted vertically so an automatic thermostat can be fitted.
All Trades
No one is to walk on the heating elements except the carpet layer.
Carpet Layer
Specification For Wiring Under Carpet Heating
- For manual thermostats mount flush box above second nog or at approximately 1680mm above floor level to ensure a correct room temperature reading.
- For automatic thermostats mount flush box at any desired height as they utilise a floor probe.
- The flush box should be mounted vertically to allow for a programmable thermostat.
- Holes for the draw wire should be a "Minimum of 25mm" diameter to ensure that no jamming occurs while pulling wires up from the floor.
- DO NOT use TPS cable as a draw wire, single core wire only to be used.
- Check bottom plate out to minimum dimension of 50mm wide and 25mm depth.
- Nail or staple draw wire to floor to stop it from being removed or lost during construction.
- It is imperative that the draw wire be free to move and not be jammed by any wall tiles, wall insulation, nogs or skirting.